Table Of Contents
The Graphic View is the white portion of the Document Window (see Major Components for a diagram). Graphics are created and edited on the graphic view using the mouse, touch and keyboard as controls.
The graphic view delegates functionality to a sequence of Layers (Consult that section for further information) called Overlays. Overlays can be turned on or off producing the effect of "overlaying" sheets of transparencies for comparison purposes.
The following details the graphic view in terms of the inspector editor controls.
Graphics
The Graphics editor is used to adjust graphic-related attributes as detailed below. Notice that overlays are considered a graphical attribute even though they are a node-related concept. That is because all embedded graphics are contained in the overlays and those embedded graphics are graphical in nature.
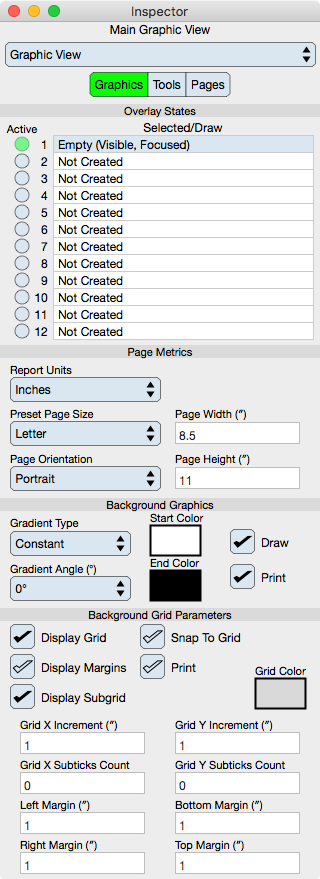
Overlay States
Active Overlays : The graphic view has twelve possible Layers which are called overlays. Those overlays can be made active (display turned on) or inactive (display turned off).
Overlay Table : Shows the status of each overlay. Select a cell to focus on that corresponding overlay. Only the focused overlay can be altered with Controls, namely the one that accepts mouse or touch events. Only one overlay can be focused at a time.
Page Metrics
The Graphic View's area is the page area by definition and is reported in the report units as specified below.
Report Units : Defines the units that are reported in the Cursor Information and also the Spatial Metrics section of the Graphics editor.
Preset Page Size : A list of commonly used sizes for the page.
Page Orientation : The dimension of the page is normally Portrait. However, it can also be set to Landscape which means that the x and y values are transposed. Notice that this distinction will not transpose the embedded graphics, rather it simply transposes the page coordinate length values.
Custom Width and Height : The Graphic View can be set to a custom width and height by entering those values into the corresponding text fields. The values are in report units.
Background Graphics
The background graphic is the Rectangle that provides the backdrop for the graphic view.
Draw : Normally the background is always drawn and should be left that way. If the graphic view is associated with a non-rectangular template then the graphic view background should be turned off.
Print : If on, the background prints otherwise it does not print.
Start Color : Specifies the Color of the background.
End Color : Specifies the gradient end Color. This only has an affect if the gradient type is non-constant.
Gradient : The background graphic is normally a solid color. The gradient attributes specify a function and orientation of a color change from the start color to end color.
Background Grid Parameters
The background grid is the Graph that provides an alignment grid for the graphic view.
Snap To Grid : When on certain movements of graphics such as dragging and cursor (arrow) keys increment according to the subgrid locations.
Display : Turns components of the grid on or off.
Print : When on, the grid prints along with the other graphics. Normally, the grid is not part of the print definition.
Margins And Grid : The Grid defines a discretization of the Graphic View's drawing area. When you snap to grid (to the subgrid actually), then that discretization is active in addition to simply displayed. The margins define the boundary of the grid, and do not define the margins of a page. Margins are a convention and not enforced.
Grid Color : Specifies the grid Color.
Notice that the grid and background are graphics in page zero. They can be selected and altered directly, beyond the minimal attributes described above, by first choosing page zero in the Tools editor described below.
Tools
The Tools editor is used to access controls that affect the entire graphic view. They do not necessarily relate specifically to the graphic view but are dependent upon the graphic view.
Advanced Tip: Some tools such as wizards, clearing history, et. al. only make sense in a contextual focus (focusing on a particular graphic or layer) in which case the Graphic View editor is not visible. Use the Navigator to reestablish the Graphic View editor while not changing the focus on the Graphic View.
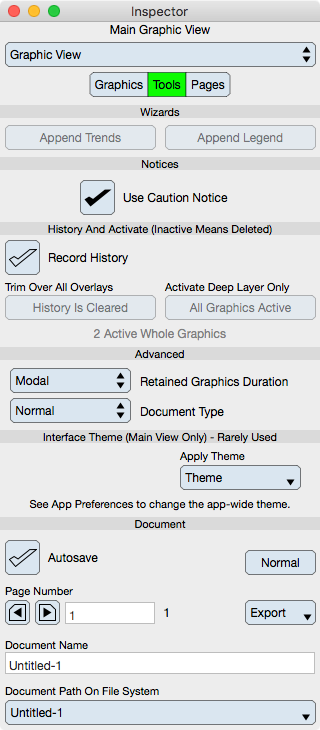
Wizards
Append Trends : Selecting this will append Trends to the graphic view. Use the tool menu in the Status Bar for a more contextual use.
Append Legend : Selecting this will append a Legend to the graphic view. Use the tool menu in the Status Bar for a more contextual use.
Notices
Use Caution Notices : A destructive action such as deleting graphics causes a query to ask if that is what you want. Turn this off if you do not want the query.
History
Record History : When on a History of user interaction is recorded. This is required for undo processing.
Auto Save : When on anything that dirties the document causes the document to save.
Clear All History : Select this button to clear the history of the currently focused graphic. If the focus is on a Layers then the history for all elements of the layer are cleared. This operation is irreversible (unless the document is reverted before it is saved).
Activate Graphics : Deleting graphics causes them to become deactivated and they are still retained (even if history is off). Those graphics can be recovered by selecting this button.
Advanced
Retained Graphics Duration : One of None, Modal or Always. This is an optimization setting and should probably be set to Modal. Set to None if you are using magnification. Set to Always to speed up the graphics display. Retained graphics uses concurrent processing so can be substantially faster for higher core computers.
Document Type : One of Normal, Template or Flat Template. Template is mainly for programming and for making a skin. The default and recommended setting for a user-oriented document is Normal. Normally a document stores each page in a separate directory so that each page can be retrieved efficiently on demand. A Flat document stores all pages into one archive file in the document directory. Flat is more efficient and good for simple template documents.
Interface Theme
Apply Theme : Select an option from the pull down button to change the theming of the graphic view. The theme is only applied to the current graphics and if additional graphics are created then the theme will need to be reapplied. Note that this is different then the app-wide control theme setting in the Application Preferences.
Document
Autosave : When selected then the document is saved upon each change of its content.
Palette Mode : One of Normal or Palette. While in Palette mode, graphics can be dragged from the Graphic View to a view in a different document or application.
Page Number : Pages are part of the Document. One page is shown in the Graphic View at a time, with the exception of page zero, which is a background page. The background page is always displayed and is where you can place footer or header information, for example, for multi-page documents. Use the page controls to select and display a specific page.
Export : Used to export the document contents to another format, mainly SVG.
Document Name : This is the name of the document that appears at the top of the Window (for windowed systems such as the Mac and Windows). The name is separate from the document file name on the file system. The window title is comprised of the document name and file name. In a cloud situation the name makes more sense because the document does not have a (local) path in the cloud.
Document Path On File System : Shows the path of the document on the file system. Select this pop up button to see the path components. On the Mac, selecting a path component will present the Finder focused on that path element.
Pages
The Pages editor is used to navigate and make pages in the document.
Tip: Use the Status Bar to scrub all pages where scrub means to quickly move from one page to another using the number selector slider.
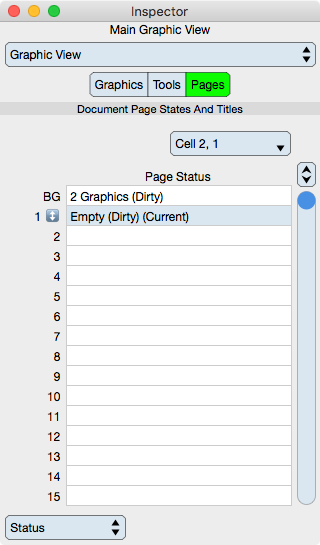
Table
Table : Shows the page information based upon the Table Mode. The first row is the Background Page. Click a cell to make the corresponding page if needed and to make that page current. The row shows the number of graphics, whether the page is dirty and how many inactive graphics are on the page.
Table Mode : Either Status or Titles. While in Status mode the table can be used to show each pages status and also to select the current page. While in Titles mode, each cell of the table shows the title of the page and those titles can be edited using the operations as define in Tables.
Tip: Use the up and down arrows on the keyboard to swap pages.